Showing posts with label Wall Accesories. Show all posts

DIY Subway Art for My Son

Pin It

This week I created some easy DIY Subway Art! You don't need an expensive cricut or silhouette...but it would sure be nice to have. LOL Come on and I'll show you how to make one yourself!


After I found a quote I wanted, I created the layout I wanted on Picnik.


I recently learned about blockposters.com, thanks to Because (I Think) I Can! This is a site where you can create posters from any size image. You then print it out on our printer. I printed mine at the approximate size of the canvas I had.


I watched Celebrity Apprentice on my computer and I started cutting away each letter with an exacto knife. It was easy, just time consuming. It took the whole episode. :)

I then taped the sheets together for easy stenciling.


I got a 20''x 20'' canvas at Michael's for 40% off. I painted it a shamrock green color as the base. I placed my make-do stencil on top and stenciled away with white craft paint.


This sign was created for my youngest son's new room. I wanted something to best describe how mommy and daddy feel about him and inspire him as he grows. I took weeks looking for the perfect quote. Well at least it took me that long to decide on the perfect one.

This special boy has overcome many obstacles in the past year. We are so proud of him.
And he's super happy because his room is finally done! :) The reveal coming soon!


Linking Up HERE

  • Digg
  • Del.icio.us
  • StumbleUpon
  • Reddit
  • RSS

DIY Personalized Wood Sign

Pin It

I wanted a creative way to display my son's name letters in his new room. So I came up with a fun wood sign. I love the way it turned out!!


Let me show you how to do this simple DIY personalized wood sign!

First you need a piece of wood. Mine is 4 feet long (1x10), but you can use any length and width you want.  Then I found some very cool scrapbook paper at Hobby Lobby that looked like chippy peeling paint.


I cut the papers down to equally to cover the length and width of the piece of wood.
I then mod podged the papers down on the wood.
Make sure not to use too much glue or it will make the paper bubble.


Don't worry about cutting the paper so neat and straight. The edges will be covered with trim pieces.
While the glue dried, I put heavy books on top of the paper to prevent any bubbles.


I then cut pieces of lathe to go around the edges of the wood and in between each piece of paper. I stained the lathe pieces with MinWax Early American Stain. I also stained the sides of the wood board as well. I attached the lathe with nails from a nail gun.


I already had these letters from Hobby Lobby that I painted black, distressed and stained. We had these displayed in my son's old room just by adding sawtooth hangers on the back. I didn't want these go to waste, so I used these for his new sign.

If you don't want to use wood letters, then you can easily stencil letters directly on the the paper or use vinyl letters from your Cricut or Sillhouette.


 I nailed each letter on each section with nails from a nail gun.

Now my son has a fun sign for his new room that is colorful and a little rustic (for mom's taste).


Here is the close up of the 'wood' paper. When I showed my hubby the finished sign he asked where I got the old wood at. :) He was surprised it was only scrapbook paper!


Here's the breakdown of the costs:

4 foot 1x10 wood board: $3.50

5 pieces of scrapbook paper at 36 cents each: $1.80

Wood Lathe: Free-Had on hand
You can buy a bundle of wood lathe for around $7 or $8. It will last you forever! I used it for a lot of projects!

Wood letters: Free-Already Had

Total: $5.30!


Another fun and easy project! And most importantly, I have a very satisfied customer. :)


Linking up HERE

  • Digg
  • Del.icio.us
  • StumbleUpon
  • Reddit
  • RSS

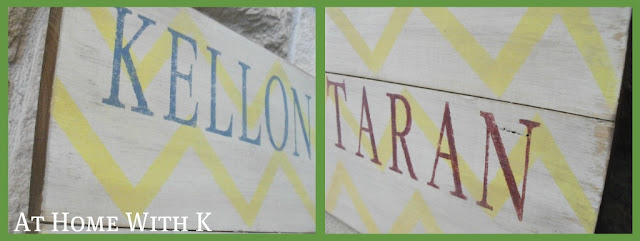
Chevron DIY ART

I love the popular chevron art all over design and blog world. But I was kind of unsure for my home and style. So with our bright craft room makeover, I thought it would be a good opportunity to whip up a little art for our bright and cheery room!


I went to my wood stash and found 2 (approx. 7 inches wide) pieces of wood that are 26 inches long.

I connected the the 2 pieces of wood with 2 short firring strips of wood with just a nail gun. You could also use glue or screws.

I painted the front side only with white craft paint.

After it was dry, I used painter's tape to create my own twist to the chevron pattern. I didn't take a picture of that part because I did it more complicated than it should of been. LOL


I then stenciled my boys' names using their favorite colors.


After the paint was all dry, I sanded down the surface and edges with sandpaper to give it a worn look.


I stained over the paint and sides with Early American MinWax Stain, to look a little more worn. :)

I purposely didn't paint the sides of the sign, I like the look of the wood/paint contrast.


It looks super cool in our vivid turquoise craft/kid room!


I was about to pull out my hair creating the chevron pattern, but I love how it turned out. Adding a little fun design to our fun room!
And best of all, this project was free! Now who doesn't like free?!


Let's stay connected!


Linking up HERE

  • Digg
  • Del.icio.us
  • StumbleUpon
  • Reddit
  • RSS

Urban Walls Vinyl Decal Giveaway!

I have a fabulous giveaway for you today!

Urban Walls would like to give one At Home With K reader a $50 credit to spend at their Etsy Shop! Wow!

Urban Walls has a wide variety of designs of vinyl decal to transform any room from drab to fab!

  From creative sayings to cute designs, Urban Walls will help you create a look and feel that is perfect for your home!

Here are just a few examples of what Urban Walls has to offer:

Wonderful words to inspire you, like this ONE


You will find this Wonderful Decal and many others to dress up your kid spaces.


 Decorate your space with this wonderful damask pattern


Chalkboards are everywhere! How fun to have a fun vinyl design to use for your To Do lists.


Personalize your space with a monogram
I would love this one for my office space!


Now here's how to ENTER!

Here are the RULES: (You need leave a separate comment for each entry.)

1. Be an At Home With K follower or subscribe (on the sidebar)  and leave a comment at the bottom of this post telling me that you're a follower. (This is the only mandatory entry.)

2. Be an At Home With K Facebook Fan and leave a comment at the bottom of this post telling me that you're a fan.

3. Be an At Home With K Twitter Follower and leave a comment at the bottom of this post telling me that you're a follower.

4. Visit Urban Walls and come back here and leave a comment telling me which vinyl decal is your favorite!

4 ways to enter the giveaway! Good luck!
The winner will be announced on Monday, February 6th!


  • Digg
  • Del.icio.us
  • StumbleUpon
  • Reddit
  • RSS

Art Display Board

I have been busy adding to the details of our kid/craft room. My hubby has been an excellent helper as well. He helped me a great deal with this project I'm going to share with you today.


We had a large art display board in our mudroom area. Well now since the current mudroom makeover, we needed to move it to another area of the room.


The downside of our new craft room is 2 cement walls. The 'perfect' spot for the peg board was on a cement wall of course. :) I wasn't too keen on drilling a bunch of holes in the wall and neither was my hubby. So we decided to adhere the peg board the the wall using 1x4's.

We figured out the placement of the pegboard and we placed 1x4 wood pieces around the perimeter and also a couple in the middle.


We used Power Grab Molding and Paneling Adhesive. It is great stuff!
We allowed the adhesive to dry overnight before we added the peg board.


Before we attached the peg board to the 1x4 boards, we added plastic clothespins to the holes. These clothespins are actually magnets that I found at Office Max. They already had a predrilled hole in the back. So it was easy to add a screw to thread through the holes.

These clothespins were also clear when I bought them. I spray painted them with a primer and then a textured black paint.

To attach to the back, we add small washers.
We could of easily used peg board hooks, but I loved the look and function of the clothespins better.


We attached the peg board to the 1x4's using screws.

Now we could of been done after this but I wanted to add some trim to cover up the edge of the 1x4's peaking through the sides.


I went to my local salvage center and found 24 feet of lovely thick old molding for only $5!


I didn't even have to paint it. I love the chippiness and crackle of the old paint. We attached the old molding directly on the cement wall using the same Adhesive above.

And I didn't even bother to fill in the corners with spackling. I love seeing the mitered corners to match the imperfection of the old wood trim.

So with a little team work, we have a wonderful diplay board ready to fill with our boys' art.

Did you see our oops? It doesn't bother me now...but imagine my disappointment when I brought this lovely wide trim home to realize we calculated enough room between the peg board and ceiling for thinner trim. And the 1x4's were already glued on the wall. LOL I had no intention for the trim to bud up against the ceiling like that. And yes, the trim is exactly 5 inches wide, just enough space to squeeze in there. :)

So keep that in mind when you are shopping for all your supplies to allow room for everything. I just fell in love that trim so much that I couldn't pass it up!

When I originally did this peg board a couple years or so ago, I originally got it unfinished at our local home improvement store. Stores carry many different sizes, I really liked the 4 foot x 4 foot size. I painted the whole piece red and then added the white stripes using painter's tape. I also stenciled my boys' initials and some stars on it as well. I then sanded it all down and then added MinWax dark walnut stain to richin' it up a bit.


 Our boys love arts and crafts (my 4 year finally caught the craft bug a couple months ago), so this space is going to be filled with creations and imagination for years to come.


Do you have a fun space to display your child's art?

Stay tuned for more craft room projects...

Kindra

Linking up HERE

  • Digg
  • Del.icio.us
  • StumbleUpon
  • Reddit
  • RSS

Haul Out The Holly: Christmas Tree Twig Art

Haul Out the Holly,Gwenny Penny,Christmas tutorials

I'm so excited to be a part of the Haul Out the Holly Event again! I had a great time making my felt poinsettias for last year's event!

This year, my project is going to be just as easy and thrifty.

I'm going to show you how to make Christmas Tree Twig Art


I first started with 3 pieces of scrap beadboard I had on hand. Now you can use anything you have available at home. 1x3 pine pieces would work great as well, like I did HERE.

I cut them equal length:16.5 inches
You can use any desired length of your choice


I then took 2 pieces of lathe wood to secure the 3 pieces of wood. I used Gorilla Glue and then nailed them in place. If you have a nail gun, then that is a nice time saver! I love mine! Don't know what I would do without it!


I wanted to create a simple frame around the edge of my beadboard for a more finished look so I cut up a 1/2 inch x 1 inch trim piece in 4 pieces. Mine were approx. 10.5 inches (2) and 15 inches (2) long.
I painted the beadboard an off-white color and then painted the trim pieces a dark red.


While your wood pieces are drying, go out in the yard and start searching for some twigs for your art piece. This is a great opportunity to get your kids involved.


After the paint was dry. I sanded down the edges of the painted wood pieces and added a little Early American MinWax Stain to give them a worn look that I love.

After they were dry, then I glued down the 4 trim pieces with Gorilla glue and a nail gun around the perimeter of the the beadboard. It gives it a nice finished look.


Now the twig tree is so easy. You just start breaking up your collected twigs. I started from the bottom with the longest piece and worked my way up...getting shorter and shorter, until I reached the top. I used 3 small twigs for the trunk. I simply used a hot glue gun to secure the pieces on the beadboard.


For the star, I used skinny twigs all broken in 5 even lengths. I made a star figure and secured the ends with hot glue. I wanted to add a little more interest to the star so I wrapped thin twin around the points and glued them to secure them. They are more for looks than function. :)


The power of scrap wood, nature and a glue gun to create your own Christmas Art!


Thanks so much for visiting today. And a big thanks to Gwen from Gwenny Penny for having me join in on the the Haul Out The Holly Festivities!

Now the event continues for 3 weeks! There will be a featured blogger each day showing off a fun Christmas craft tutorial that you can make, too!


Linking up HERE
Best DIY Projects of November-Beneath My Heart
Christmas Linky Party at Someday Crafts

  • Digg
  • Del.icio.us
  • StumbleUpon
  • Reddit
  • RSS
Related Posts Plugin for WordPress, Blogger...