


The blog originated as a place for me to collect ideas and images for my own home, but I've been oddly reticent to share what I've done in my own home (18 month renovation and counting!). When you spend so much time looking at pictures of work by professionals -- designers, photographers, artists -- you get to a point where yours will never measure up. (And let's not mention the work to get a home "photo ready.") I thought what I'd do instead is share "corners" -- small bits of my home that I'm especially proud of.
This is the reading nook in the (new) upstairs playroom (we built on 2 bedrooms, a bathroom, and a playroom over our garage). The steampunklet and I sit here for bedtime stories... It's also a great place to web surf when she's playing. (Another step backwards and you would see the lincoln logs that are just out of the picture... :) ) The sconces are repurposed old fire alarms that my father in law gave us. I asked designer Roni Koltuniak how I could use them -- she suggested using them as sconces and arranged to have one of her tradesmen drill the holes that cast such awesome shadows (she also had a big hand with the paint color choices, which I discovered I'm not very good at!).
 Here's a peek into the bathroom -- it's panelled in red and picks up the sconces and the chair. (Please ignore the temporary blinds!)
Sources:
I'm pretty frugal, as you'll see from this list...
The red chair is from a local Salvation Army Thrift Store -- I forget if I paid $50 or $75 for it. The brass reading lamp is likewise from a thrift store, so long ago I've forgotten how much I paid for it. The side table is from Urban Outfitters for $60. It's still available. The clock is by Timeworks, found on One King's Lane for $49. The jewelry case is thrifted. The black wooden skull I picked up on a visit to Chichen Itza, I think it was $15. Goggles were a gift from the steampunklet for Christmas, from Restoration Hardware. If you can't live without a fire alarm of your own, there's one at Urban Remains Chicago for $695!
The bathroom tile is basic white subway tile by American Olean from Lowe's. (Laying it in a herringbone pattern is what makes it look luxe!) The red paint on the bathroom panelling is Benjamin Moore Heritage Red. (I'll do a post on the bathroom once it's "picture perfect.")
The ceiling fan is Lowe’s Harbor Breeze 74” Twin Breeze. The walls are painted Woodruff by Laura Ashley Home (also from Lowe's). The trim is Valspar Lincoln Cottage Black (Lowe's again -- see a trend?) I can't track down exactly what model the carpet is, but it's a Stainmaster carpet with very subtle Victorian swirls in it.
What do you think? I love it! It reminds me very much of the minimalist steampunk post I did a couple of years ago -- the lack of clutter seems especially approriate for a playroom, which has plenty of it's own stuff to go around.

Playroom Reading Nook -- Corners of my Home


My New Ceiling Fan

I'm moving to my master bedroom in my home renovation, and I knew I wanted a ceiling fan. Luckily, ceiling fans can be very steampunk (are they originally Victorian, or do they all just look like they are?), as is evidenced by the posts I've done on ceiling fans in the past. The trick for my room was finding something that wasn't too big or too expensive, and that combined the ceiling fan with lights. Oh, yes, it also couldn't be too big or too low, as it was going in the bedroom of a 1960s era house.
Todd came to my rescue by spotting this one at his local Home Depot. It's the Hampton Bay 13 In. Berre Walnut Depalm Ceiling Fan -- 20 inches high and $299. It was out of stock for a while, but now it's back in and I just ordered it.
Sneak Peek -- My New Kitchen
For some reason I get all self conscious and procrastinate when it comes to sharing pictures of my own house. (Other people's homes, sure, no problem. Mine -- yikes!) But I'm really pleased with how my kitchen is coming along, and wanted to share it with all of you.
I want the feel of a Parisian bistro-- it's not there yet, but I think once the lighting and hardware is in, we may get close.
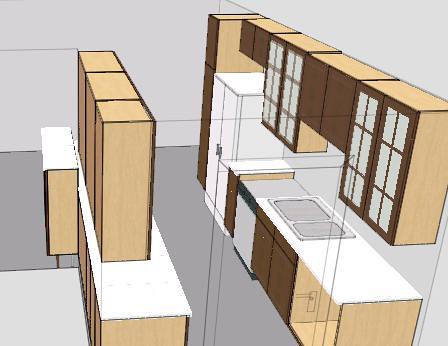
 This is very much "in progress" -- the view into the kitchen would show some gaping holes under the cooktop and where the oven goes, and there is an obvious cover panel missing at the end of the upper cabinets.
Formerly there was a row of cabinets blocking this view -- getting rid of them has done amazing things to open up my living room as well as the kitchen. The cabinets are all Ikea Liljestad. I repurposed some glass front upper cabinets to make the breakfront cabinet on the penisula -- I'm hoping it hides a lot of the potential mess on the countertop.
I've been angsting over what to do with the replaceable panel refrigerator for over a year. After getting the cabinets in, Ben says it needs to move up on our list. I agree. This pretty half moon over the sink is the "complicated" part of the kitchen. It was cut from some broken tabletops my dad had bought over 30 years ago that had been sitting out in the weather since then. My countertop guy said it would never match the carrerra marble I used for the countertops. It did. Perfectly. :)
The sink is the Ikea Domsjo sink. The fixture is Kohler Fairfax, off of eBay. You can pull the whole faucet part out -- a requirement so Ben can get his homebrew pots filled up.
The horrible yellow is the glue left over from the linoleum backsplash. I'm covering it with a black and cream vinyl wallpaper. I'm shopping for a small art deco light fixture on eBay for over the sink, and I may try to cram a mirror in that area, too. We'll see.
I'll post more pictures when we're all done.
Spice Rack = Medicine Cabinet

This was a clever reuse of a neat spice rack my sister found for me at a thrift shop. My mom cleaned it up, and we thought I'd use it in the kitchen for a look similar to this kitchen. That didn't work out, so I repurposed it for a medicine cabinet in the bathroom. It looks even better right after you fill up the jars with colorful vitamins.
My Mantel
Mantels are fun and easy decorating -- easy to change on a whim, relatively easy to put together. Mine currently has some of my steampunk finds, arranged in what I hope is a artistic clutter.
From right to left, an armillary sphere (I found it on clearance at Target), 3 gauges (eBay) destined for some project, an ornate candlestick picked up at a thriftstore, part of my glassware collection (more details below), a small antique brass surveyors level that used to be my Dad's, 3 more candlesticks with decorative balls on top, some natural treasures (geode, polished shell, and some fossils we've found with a steampunklet) and a framed picture as a backdrop. It all sits on a red velvet valance draped over the mantel. Here's a closeup of my glassware, which I love for it's pseudo-scientific feel. The hourglass is from CB2, one galileo thermometer and "hand bubblers" were culled from Ben's childhood room, and the larger one I found at a thriftstore.
 The last of my glass collection, which doesn't actually sit on the mantel, but rather on the stereo cabinet in the same room. Fun modern and reproduction antique chemistry equipment.
The problem with glass is that it's clear. Yes, that's traditional, but it tends to fade into the background. I've been wondering if some colored lab glass would be a good addition.
If you'd like to do your own mantlescape, it's a great place to start, and you can play with it and change it up all the time. Elements of Style has a good post on mantlescapes to get you started.
My Mad Scientist Lamp
 I have a tendency not to share projects I work on, mostly because they are not as cool as what the more accompished steampunks do, but I was really pleased with how my Mad Scientist Lamp turned out. It now lives on Ben's bedside table and is used as an adjustable reading lamp.
Aren't those great lightbulbs?
An Iron Horse in My House
So my birthday is tomorrow, so to celebrate I decided this week would be all about my house. Egocentric? Absolutely, until you realize that you'll be seeing my fear of color (lots of white walls!), a bit of mess, and some decidedly undone bits. I hope you enjoy it anyway.
I wanted to start with this mural I've put above the bed in the master bedroom. It's a high contrast photograph called "Iron Horse" from Mr. Sable on flickr (who has a very nice collection of steampunk pictures). I had WallHogs print it into what's basically a big sticker that you apply by "burnishing" (rubbing with a straightedge). One of the nice things is that it's removable, so this technique could work for rentals or a dorm room.
I suspect it would look better with a frame of some sort, and I do wish it was larger.
Thanks to my sister, who's much better with a camera than I am, for taking this photo.
Writing on the Wall
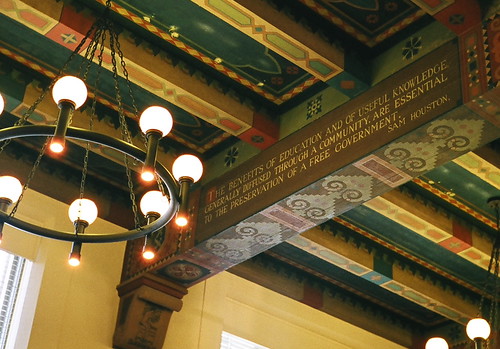
My friend Patrick recently took this beautiful picture of the ceiling in the reading room of the main building at the University of Texas. Built in 1937, it made me realize that while using text as a decorating element has risen in popularity in the last couple of years, it is by no means a new phenomenon. (It says "The benefits of education and of useful knowledge, generally diffused though a community, are essential to the preservation of a free government. -- Sam Houston")
Here's another example from my library/dining room:
("I get a warm feeling among my books." --Anthony Powell) Although a less lofty sentiment, it suited the ambience of the room. While the reading room's phrase is painted, mine is done with Wonderful Graffiti, which makes it incredibly easy to create something suited perfectly to your environment -- you choose the color, size, font, and words. It goes on like a sticker (it's a bit harder than that -- you have to burnish it with a flat edge -- but easily done in an evening), and can come off without any permanent damage to your walls. (It's perfect if you rent.)
What quotes to use? At first I came up nil, but then ran across this one at the beginning of Cory Doctorow's new story: And I won’t always be this way, When the things that make me weak and strange get engineered away. —Jonathan Coulton, “The Future Soon” It has just the right sort of quirky appeal that I'd put into a bathroom. In my experience, if you just keep your eyes open, an appropriate quote will come across your radar. (And please, share any good ones you come across here.)
My New Kitchen
 I wanted to share with you the plan for my new kitchen. It's one thing to hunt steampunk stuff and post it to the blog or introduce a lamp next to your bed, but I'm finding it much more challenging to design actual rooms in a way that all the pieces will work together and come in within a budget.
Like most people, I can't afford custom cabinets, so I went with the most-quality-for-your-money Ikea kitchen cabinets. "Ikea?!" I hear you saying, "How can that be steampunk?" Well, it's a challenge, but if you think Ikea is nothing but Scandinavian Modern, you may want to take a look at the Liljestad cabinets. An added plus for steampunks -- Ikea kitchens can be varying levels of DIY. We'll probably assemble all the cabinets ourselves and use a contractor to actually hang them, but if you have more time than money, doing the entire install yourself is entirely feasible.

Ok, enough of the Ikea commercial, on to my kitchen. If you want to see the specific layout of my kitchen you can see it here and here. I chose Liljestad because it has the nice dark wood I like. With lots of glass front doors, I'm hoping it will have the feel of a turn of the century Parisian Bistro.
I'm steampunking it up with a handful of elements. The light over the penisula will be Architects and Hero's Akordian Two Light.
And the backsplash will be antiqued metal -- most likely copper. Here are two of the contenders:

 Korel Design Tile (porcelain, with a copper, bronze, and platinum glaze) This may end up on the floor instead.
The hardware for the cabinets will likely be brass or copper bin style pulls. (Could I combine copper and brass elements? Would this get too "busy"?)
The problem I'm running into is countertop material. The sort of look I'm going for means the traditional countops would be sheet metal -- zinc or copper for instance -- but that's an expensive and impractical plan. The other traditional counter surface is white carrera marble. Now, I would love carrera marble, but it's fragile and prone to staining. So where does that leave me? Stuck. Do I use a fake carrera marble like Okite's carrara bianca? Do I find a marble that's mostly white (most of them have a lot of yellows and gold in them, which might work nicely with the brass?) Choose a manufactured stone in something that resembles travertine? Any one have other ideas?
So this is more of a "brain dump" sort of post, but I would love your ideas and opinions. Anything strike you as a particularly good or bad idea? Anything else I should have though of?
Electronics Shadowbox

Not everyone is as lucky as I am. *I* have a power electrical engineer for a father-in-law. I know, I know not something most people are envious of, but my father-in-law has a shop full of old bits and pieces of electronics and industrial equipment salvaged from the oil refineries he builds substations for.
The picture doesn't do it justice, but this is one of my "finds" from our last visit -- some sort of massively parallel power supply/controller mounted in a shadowbox and hung next to my back door. I loved the colors -- bright green capacitors and pink wires, and the fact that it is almost symmetrical but not quite.
As projects go, this was super simple -- remove some rods and screws that were sticking out of the board, buy shadowbox, mount with 4 stickpins, and hang. Not bad for such a unique piece of art!
p.s. My father-in-law wasn't quite sure what this was used for, so if you have an idea let us know in the comments!
Mod My Fridge!

So if you were around last summer for the refrigerator posts, you may remember that I was leaning towards modding a panel front refrigerator as the most cost effective way to get a stylish fridge. After some regular Craigslist watching, $400, and the manual labor to haul it home 30 miles, I'm now the proud owner of a 5 year old, cabinet front, counter depth, GE fridge similar to this one.
So what's a steampunk homemaker to do with such a thing? It probably isn't the obvious first thing, but I've started by buying gauges on Ebay.
 I liked the irony of having a heater gauge on a refrigerator.
 This one is actually a working fridge thermometer -- if I get the probe sensor inside, I'll actually get the internal temperature on the outside.
  This one is just a pressure gauge, easy to find on eBay.
 Gauges for Milliamperes and Microamperes
Beyond the obvious "buy cool stuff" part of it, I think the actual first step is going to be finding/fitting/cutting some brass sheets to replace the cabinet fronts with.
I'm not the most artistic person, so I'm a bit worried about the whole "design something that looks good" aspect of this project. I'm taking inspiration from this Kohler ad, the Steampunk Treehouse, and Roger Wood's Klockwerks.
I'm soliciting ideas -- what else should I do with it? Do I go overboard and cover the entire front or should I take a more restrained approach? Any ideas for how to cover the black plastic of the water dispensor and the black handles that run the length of the doors? At this stage of the project, I'm open to any suggestion, no matter how crazy. Bring it on.
My Steampumpkin
So it's a bit late, but I wanted to show off our steampunk pumpkin from Halloween:
Although he bears an unfortunate resemblance to the Planter's Peanut Man, he is charming in his bowler (there's a pair of goggles that you can't really see perched on the bowler), mustache and monocle.
He's even more charming in the dark:
I can't take too much credit for him though -- the idea was mine, but the execution was all Ben.
Lab Glassware, realized

I'm very pleased with how the CB2 borosilicate vases turned out (although they managed to mess up my order, sending me only 2 of the 3 long necked vases, they have since rectified the situation to my satisfaction).
A nice, scientific touch to my library/dining room.
The beaker pitcher and the hourglasses were also ordered (and the small hourglass already broken by the steampunklet, sigh), but I'm still working on where to put them, so no pictures yet.
Lab Glassware
Aesthetically, lab glassware hasn't changed much in the last 100 years. (Borosilicate has been around since the 1890s.) Why does this matter? Well, that means that lab equipment is the one place where steampunk decor overlaps with the ubiquitous modern decor. We like it because it evokes the scientific romanticism of the Victorian era. Modernists like it for the clean lines and clear glass.
What this odd coincidence means is that there is a lot of innovative chemistry lab equipment based decorative items out there for some very fair prices. I ran across a surprising nice set at CB2, the "little sister" of Crate and Barrel, which features affordable modern furnishings.


While I've browsed a lot at the large scientific supply houses for chemistry glassware, I've just ordered everything on this page because it *doesn't* have the ugly modern trappings that many (but not all) of the professional gear has -- plastic stoppers, painted on measurements, etc. The prices are also quite fair when compared to the supply houses. If you'd like to do your own comparisons, check out Cynmar, Delta Education, and Indigo.
(disclosure note: I don't make any money off of these particular links, but my Amazon and Ebay links are affliate links.)
Our "modern victorian" kid's table
Ben wanted to build Miss J (Steampunk Sprog? Steampunk Spawn? I'll give in and post a picture of her in her steampunk jacket before fall is over) a play table; I, of course, wanted it to to be attractive enough to "fit" in the house.
I found this table by designer John Reeves in some home decor magazine a year or so back:
A simple, elegant twist on a Victorian table, no?
So that's what Ben and my dad built:
We found a standard table leg at Lowe's, and quartered it to make the table legs. I wasn't involved in the actual table making (involved the purchase of a biscuit making machine, which made the table more expensive than a store bought option, but Ben very happy) but afterwards it was painted with a high gloss lacquer.
(note: The chairs are from Ikea, but I thought they looked right. The rug underneath is one of our Turkish souvenirs.)
