


Pizza Friday has returned to A Taste of Home Cooking! I'm very excited about this because (1) I'd grown tired of spending so much money on takeout pizza and (2) because I love finding new pizza recipes to try.
To get back into the swing of things I kept it simple with an old favorite - The Works:
Unfortunately the pepperoni looked a little funny so I had to leave it off. This pizza usually involves pepperoni, sausage, mushrooms, onion, green pepper and olives. Delicious.
Question: What pizza toppings do you enjoy? Please leave me a comment so we can broaden our pizza horizons!

Pizza Friday: The Works


Read User's Comments(0)
Kitchen Makeover
Happy Monday!
I have some before and after pictures to show of our mini kitchen makeover today! I can happily say I spent less than $20 to update our kitchen...but a lot of time painting. But it was so worth it. We are enjoying it very much!
Let's start at the very beginning with this poor before pic(except for the cute little boy). Our kitchen was UGLY with a capital U! The original 1960's cabinets complete with white plastic handles and knobs. You can kind of get the idea behind the cute little boy. :)
When we moved in, I had no blog at the time...so no fun before pics. Sorry.

After a couple years in our house, we finally decided to tackle the kitchen the best we could. We painted the cabinets black. We also added trim to all the doors and new knobs. Below, you can see what the cabinet doors used to look like. Pretty huh?

We also added new beadboard backsplash, new countertops, new sink. Then we removed some of the doors from the top cabinets to have some display space for collectibles. We painted the trim red and the walls a greenish tan color. The fan was replaced with a cute light fixture as well.
This is what our kitchen looked like a couple weeks ago.

Unfortunately the red was not the red I intended when we painted all the trim in our kitchen, dining and living rooms. It was more of rusty orange than a pretty deep red. In some light it looked really orange. But we did all that work, so I just lived with it.

There's that cute little boy that was in picture #1 all grown up and goofy. :)


So with a paint brush and some leftover paint from our hallway project, I started tackling the walls and trim in the kitchen. 4 coats it took for the lovely trim to cover all that red. Fun times. But it was well worth it!
Our kitchen is lighter and brighter!
On one wall I added board and batten to give it some interest. I used a 1x6 board for the top horizontal piece and 1x3's for the vertical pieces. I spaced them about 16 inches a part. The wood only cost me around $10.

I painted the beadboard the same color as the trim. That made a huge difference.
The fridge looks "busy" with abc fun. But I'm just keeping it real.

I painted the inside of the display shelves a greyish blue (leftover paint I had). I then added some dark walnut stain over it after it was dry to blend well with the already distressed cabinets.

The doorway is the landing to the steps leading to our basement.


Looking into our dining room.

I accessorized with items I already had or thrift finds that still needed a home. The candle and candlestick was made over by my mom.

The little shelf was a flea market find and I painted it cream. The other accessories were garage sale finds.

On my wish list is a new faucet.
The curtains are from our old house. I took them with us and finally have a spot for them. The plate above the sink was bought at TJ Maxx for less than $3 on sale. It's a pretty grey blue color.

Basket was 10 cents at a garage sale.

For the display above, I searched for all my white and cream dishes to make a more cohesive display.


Yellow plate was $2 at TJ Maxx.


My $3 mini pitcher found a new home.

I love vintage signs. I bought this reproduction Fig Newtons sign at a flea market. The little boy reminded me of my son at the time. Now I wish there was 2 little boys on it.

Another fun thrifty display. The picture frame I got at a garage sale for 50 cents and then I painted some flowers on a piece of muslin for a fun spring touch. The pitcher I got at a garage sale also for 25 cents. The box with lavender was made by my mom.


If you take a closer look at the landing in the doorway, you can see I added a special little touch to that area.

I found a fun stencil at Hobby Lobby for around $8 on sale and stenciled the walls just in that little area.

I used the same grey blue color I painted inside the display shelves. I also decided to paint the little section of ceiling as well.

A closer look.
The light fixture was replaced back in the fall. I got this at EcoStores Nebraska for FREE. I removed the outdated glass and repainted it oil rubbed bronze.

I put my recovered burlap bulletin board inside this space. I just added a matching blue ribbon. Now I need some pics to fill it up.

I will be honest, the stenciling was a little time consuming but I'm sure glad I did it. It's something unexpected.

One more look at the before and after.
Before

After
Before

After

Subtle changes that made a BIG difference.
Thanks so much for visiting today! I really appreciate it!!
I'm joining a few of these linky parties.


Ultimate Sriracha Burgers and Oven Fries
I love burgers. I could eat one a week and be perfectly happy. Besides being delicious, they're so versatile. You can switch up the meat from beef to chicken or something more exotic, the topping choices are endless and they're fun to eat. Come on, who doesn't like eating with their hands?
I've never cooked with Sriracha before, but I had a small bottle in the pantry for a recipe I still haven't gotten around to making, so when the Ultimate Sriracha Burger was raved about on my cooking board I thought I'd give it a shot. 
Since I've never cooked with Sriracha (and therefore had no clue how mild or spicy it was), I should have listened to my gut and reduced the amount of Sriracha in the blue cheese sauce. I just can't handle spice the way I could before having Baby Girl. Otherwise, this was a perfect burger. You can never go wrong with bacon, and the caramelized onions added a nice sweetness. There was a good kick from the Sriracha, which I would have enjoyed more if the blue cheese had been able to come through, and I love peppery arugula and sliced tomato. The Swiss didn't melt enough, but that was my error.
Ultimate Sriracha Burger
Oishii
1 1/2 lbs. ground beef
2 TBS. soy sauce
5 TBS. Sriracha, divided
2 tsp. freshly ground black pepper
4 slices thick cut bacon
1 large sweet onion
3/4 cup blue cheese dressing
4 brioche buns
4 thick slices Swiss cheese
1 tomato, sliced
several handfuls of arugula
In a large mixing bowl, combine the ground beef, soy sauce, 2 1/2 TBS. of the Sriracha, and the pepper. Be careful not to overmix. Form the mixture into 4 patties, and set aside, on a parchment-lined plate, covered, in the refrigerator.
Preheat a charcoal or gas grill to medium high heat. In a medium frying pan over medium-low heat, cook the bacon, turning as necessary. While the bacon is cooking, peel and quarter the onions. Cut each section into 1/4-inch slices. Once the bacon is cooked through and slightly crispy, remove the slices from the pan, cut each in half crosswise, and drain onto paper towels, reserving the remaining bacon fat in the pan. Cook the sliced onions in the bacon fat over medium-low heat until they caramelize, 20 to 25 minutes.
Grill the burgers, turning once, 4 to 41/2 minutes on each side or until a meat thermometer registers 130° to 135°F for medium-rare.
While the burgers are cooking, combine the blue cheese dressing with the remaining 2 1/2 TBS. Sriracha in a small bowl.
Lightly toast the buns on the grill during the last minute of cooking time. Spread the blue cheese mixture on both halves of each hamburger bun. Stack a burger patty, slice of Swiss cheese, bacon, caramelized onions, slice of tomato, and a small handful of arugula between each hamburger bun.
I served the burgers with oven fries. I've been searching for a good oven fry recipe for a long time and these were delicious (if not as evenly brown as I would have liked). 
SP practically inhaled his burger and fought me over the last few fries. He's a very good sport when it comes to my cooking, especially when I'm trying a new recipe, but he definitely has his favorites and has no qualms about offering constructive criticism. The only issue he had was wishing I'd done a better job melting the cheese and keeping the caramelized onions warm.
BE AFRAID, BE VERY AFRAID...
According to the latest edition of Nightline on ABC we may be in for some real sticker shock at the pump.
Not my usual blogger topic, the price of gasoline, but at just a little over three weeks til a long trip from Florida to Texas and then back, I am really afraid of what the fuel cost will be to my show.
Possibly $4 or more per gallon?
Oh my.
Not good folks. Not good at all.
I love when I find just what I "need"
Ok, so I don't really NEED a magazine rack. I wanted one, but it does serve a purpose, right? I mean, my guests need to have an assortment of magazines for their reading pleasure when they visit my home. :)
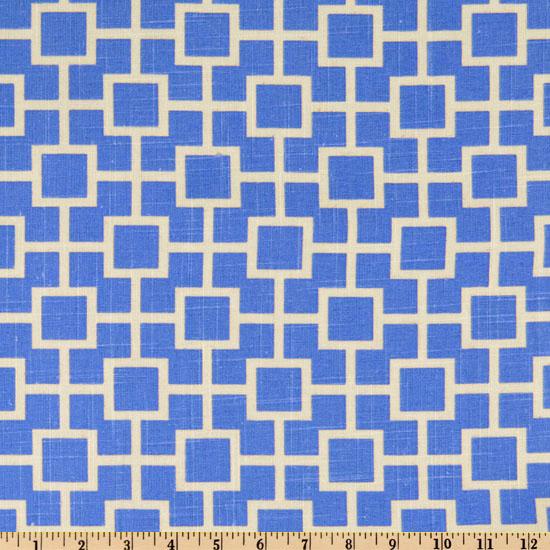
A magazine rack isn't something I am necessarily going to go out and look for, but I have wanted one, so if I saw one for a good price, I would snatch it up. So, I have the "need" taken care of, and here's where the love part comes in. The fabric below is one that I have loved for a while. I think this fabric would make fabulous pillows or drapes. However, I do not need anymore throw pillows and all of my windows are already perfectly dressed. But I just looooooved the design of this fabric. You can purchase this fabric here. 
 So, one day while I was at the Old Luckett's store, I spotted this beauty. It's a tin magazine rack with my design on it, not to mention super cheap! I get excited about the little things. :) It was red, which some people really like, but it's not one of my favorite decorating colors. So, I gave her a shiny coat of spray paint.
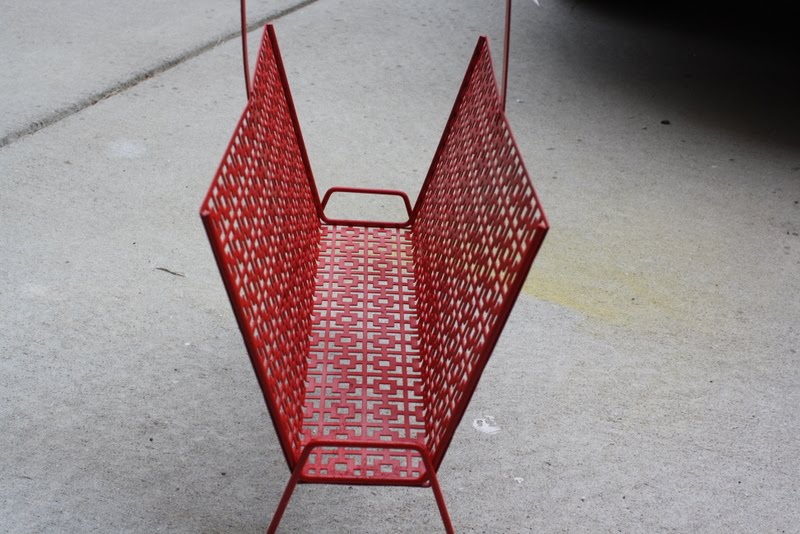

 Look how happy she is in my powder room......


Subscribe to:
Comments (Atom)
